Overview
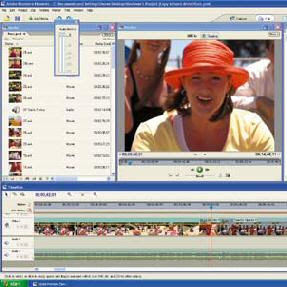
I think the programmers at Adobe simply placed a nice user interface on top of Adobe Premiere Pro to create Premiere Elements. There's a taskbar that guides you through the workflow, from capture to exporting. To help beginners, Adobe added a number of customizable presets for common operations, such as PiP effects and still-image pans and zooms.
Capturing Your Video
Using Adobe Premiere Elements to capture video is a fairly straight forward process. Elements will capture via Firewire, using either a camcorder or analogue capture via a analog-to-digital conversion device.
Once you've captured the raw video, there are a few things you can choose to do. A nice tool is to use Scene Detect, which automatically detects various scenes in the entire footage and exports it to the timeline. If you've used Pinnacle Studio Plus, you'll realize that Premiere Elements does not allows you to control brightness, contrast, hue, saturation and audio levels before or during capture.
Editing Your Video
Editing your video with Premiere Elements is pretty simple if you stick to the presets, operation remains fairly simple. However, if you venture beyond into the Effects Control palette, you'll immediately see the intimidating screens found in Premiere Pro - which may scare off novices. This is not a bad thing though - some Premiere Pro's most powerful functions like the titling tool and chroma key capabilities are at your disposal.
The timeline in Elements opens with 4 tracks showing: 2 video and 2 audio. Audio or video tracks may be added, and the link between captured audio and video can be broken so that clips can move independently. You can place transitions between 2 adjacent clips on the time line - and there is a wide variety to choose from.
Integration with Photoshop Elements
If you edit photos with Adobe Photoshop Elements, you'll be pleased to know that Photoshop Elements can be used to edit any image on the Premiere Elements timeline. Once edited, the image on the timeline is updated automatically. This tight integration with an image editor is not found in competing products like Ulead VideoStudio and Pinnacle Studio Plus.
Audio Capabilities
A note about audio capabilities to highlight here. In Elements, like in most other video editing programs, you need to record voice overs separately and then import it to the project. This is where Pinnacle Studio outshines over virtually every other editing program - you can record direct to the timeline.
DVD Authoring
Burning the edited video onto a DVD is always a problem for many consumers who are just starting out in digital video production. Fortunately, in Adobe Premiere Elements, the process is extremely simple.
The program provides 33 DVD menu templates, most of which are stunning. The program will automatically generate DVD menu markers, or you can set them manually in the timeline quite easily. However, there are restrictions - you can customize only text, neither can you modify the backgrounds that come from the templates.
Shortcomings
Although it has many great features, Adobe Premiere Elements is not without its quirks. In my test run, I found that Premiere Elements was very finicky with my MSI DVD burner during the DVD burn process. I had to render the files to a folder and then use a separate DVD burning application (Nero Burning ROM) to burn my video.
Conclusion
On the whole, Adobe Premiere Elements is a nice consumer video editing program that will please many. By incorporating high-quality effects and precise controls, along with a chroma key tool and picture-in-picture options, Premiere Elements is will allow you to make amazingly good movies. Definitely worth a look for the budding videographer.
No comments:
Post a Comment