Capture Your Clips
The first step in using Moviemaker is to capture your clips. Start the program and after it starts, capture your video from your camcorder. You can do this by clicking the tasks icon and choosing Capture Video, or clicking File => Capture Video.
Arrange Your Clips
The next step is to use the storyboard in Windows Moviemaker to arrange your clips. In the film industry a storyboard is known as a series of panel sketches showing how the different scenes in the movie will play out, and in what order.
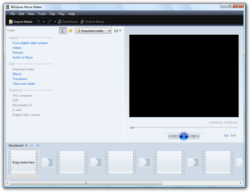
Microsoft Moviemaker uses the same concept: its storyboard is where you’ll set your clips in the order that you want. First make sure you’re in storyboard mode by clicking View => Storyboard. Then, begin by looking for your clips in the Collections panel. If you don’t find them, click on the Collections box and select your clip.
Once it’s in the panel area just click and drag your clip to the storyboard below. You can preview a clip in the Moviemaker monitor window at any time. Just use the VCR-like controls at the bottom of the window. Save your work, and move the clips around until they’re in the order you want. Save your work again. If you want to rename your clips to something meaningful, just right click and choose Rename.
Edit Your Clips
First, switch to Timeline view by clicking the Show Timeline button above the Storyboard, or by clicking View => Timeline. In place of the Storyboard boxes you see something that looks like a filmstrip.
To edit, double-click on a clip to let it play in Preview mode, and then choose Clip => Set Start Trim Point, where you want the clip to begin. This is the start of the clip. Now, to set the end of the clip double-click it again, and then choose Clip => Set End Trim Point. The clip will be trimmed, with extra footage removed. Do the same for the other clips, then save your work in Microsoft Moviemaker.
Add Some Transitions
To begin, let’s toggle back to Storyboard view by clicking the Show Storyboard button just above the timeline. Alternately, you could click View => Storyboard from the menus. To access transitions, from the menus click Tools => Video Transitions. You’ll see a whole list of transitions in the Collections Panel of Microsoft Moviemaker. You can preview a transition by double-clicking it, and watching it play in the Monitor window.
Now, how do we apply transitions to the clips? You’ll notice that there are smaller boxes separating the clip boxes from each other. This is where you drag your transitions from the Collections Panel onto the clip. You can use the VCR-like controls on the Monitor to view how your movie will play with the transitions. Remember, however, that with transitions, more is less. Be subtle, and you’ll make an effective presentation.
Add Some Background Music
Your production would not be complete without background music and narration. To add music in Microsoft Moviemaker, in the Tasks pane choose Import Audio or Music and select your files.
If you want to add narration, just toggle to Timeline view and find an empty space in the audio track for your narration. Then click Tools => Narrate Timeline. You now have audio both in the original video clips, and in additional tracks that you created.
To adjust the audio levels in your clips, right-click on any clip in Moviemaker and adjust volume, fades or mute if you desire. If you want to balance how the music works with your clip audio, click Tools => Audio levels and adjust with the slider.
Create The Final Output
Now is the moment you’ve been waiting for! You’ll create your final output. In the Tasks Pane of Moviemaker you’ll see a list of output options under Finish Movie.
You can send to web, write back to digital video, save to CD, save to your hard, and so forth. Select the one you want to use. A wizard will come up, guiding you through the rest of the output creation process.
Depending on your selected output, you will be prompted for certain specs to supply. If you send to web, for example, Windows Moviemaker will want to know what your audience’s likely Internet speed and method of access will be like.
2 comments:
Your blog is very informative man!....do you yourself write all that stuff????
Its coool
windows movie maker does not support files like vob which u get when you use a sony dvd handycam.....Videowave Professional 7 would be a better option then....
niways...thnx for the info
Post a Comment